CLUBHEAD INSTRUCTIONS & SPECIFICATIONS
For all standard hosel weight bore clubheads:
For dual weight bore clubheads (927HS, 797HS, 370CLA, 989CLA, 979SS):
For 719MW Drivers:
For EQ1-NX assembly:
SWINGWEIGHT BORE INSTRUCTIONS
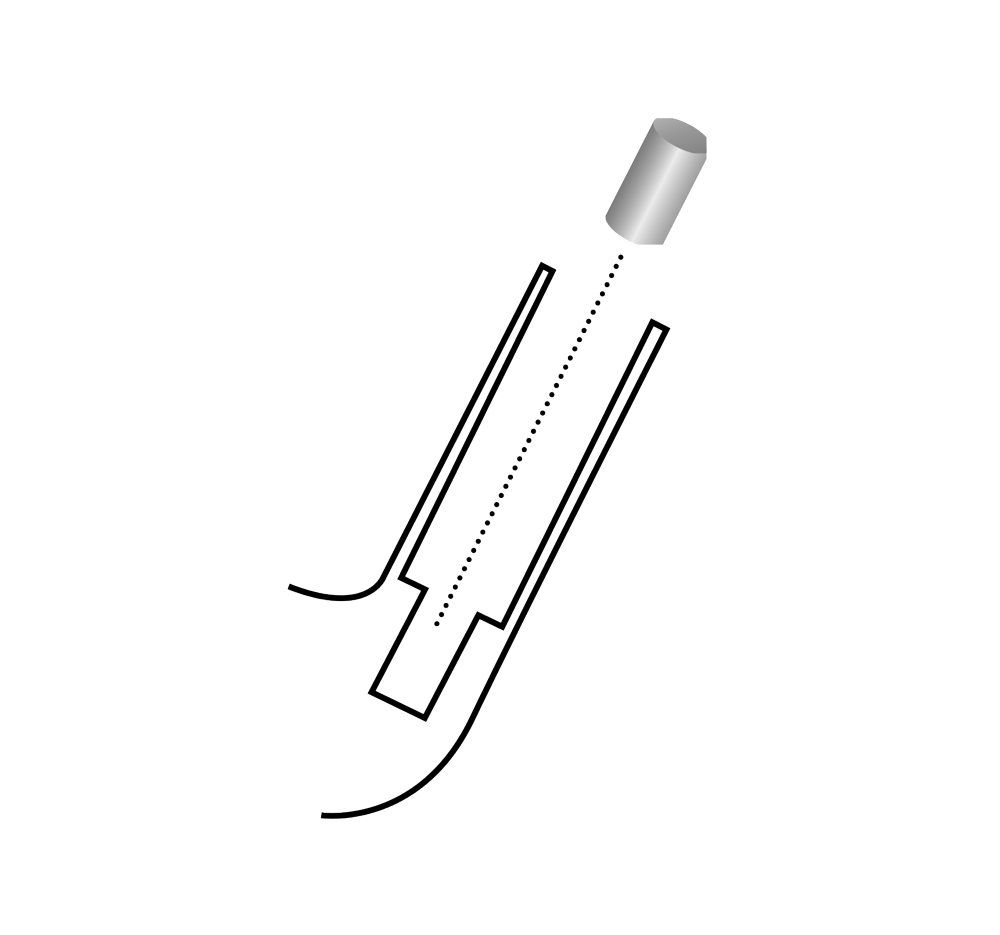
Custom fitting is at the very heart of all golf equipment designed by Wishon Golf. Finding the desired swingweight is always crucial to proper fitting.
To assemble your Wishon clubhead to the desired swingweight or moment of inertia, a unique swingweight recess which holds specially manufactured lead or tungsten plugs has been created beneath the shaft bore.
Steps for Assembly
1. After performing any required tip trimming of the shaft, properly abrade/sand the shaft tip. Test fit the shaft in the hoseI without epoxy to ensure the shaft tip penetrates to the bottom of the hosel bore.
2. With the shaft “dry-fit” into the clubhead, measure the length of the club to note the final butt trim increment required to achieve the golfer’s desired playing length.
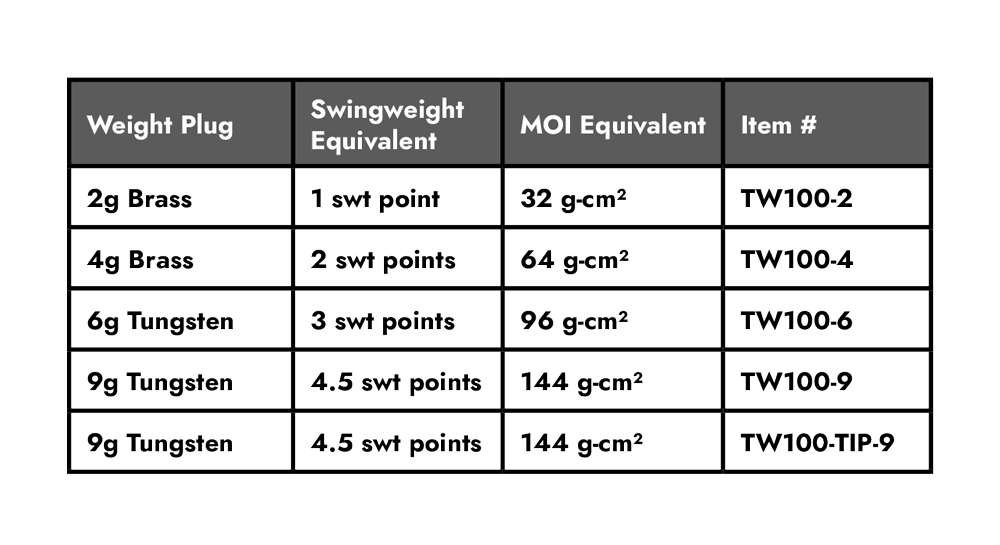
3. Using a grip of the desired weight and model that has been slit lengthwise to allow easy installation on and off the butt end of the shaft, pre-check the “dry fit” club’s swingweight or MOI. Note the weight to be added to the clubhead to achieve the golfer’s desired swingweight or MOI. The hosel weight bore of each Wishon clubhead can receive up to 9 grams of additional weight. Depending on limitations of the design, the second weight bore in a Wishon clubhead may hold between 6g and 9g of additional weight.
4. Select the proper weight plug(s) which will bring the club to the desired swingweight or MOI for the golfer. Test fit the weight plug(s) in the weight bore(s) to ensure they will fit properly. Remove any burrs from the edges of the weight plug(s) that may be preventing the weight plug from dropping all the way to the bottom of the weight bore(s). Double check the final swingweight or MOI with the weight(s) dry fit into the weight bore(s).
5. Mix the shafting epoxy properly. Apply a dab of epoxy to the bottom of the weight bore using a thin diameter stick/rod. Take care not to smear epoxy on the inside walls of the shaft installation bore so the weight plug can drop easily into the hoseI weight bore. Push the weight all the way into the epoxy at the bottom of the weight bore with a pencil or thin stick/rod to ensure a secure fit of the weight in the weight bore.
6. For weight plugs installed in the 2nd weight bore on the sole or back of the clubhead, put a dab of epoxy into the bottom of the weight bore, then drop and push the weight into the bore. Wipe any excess epoxy that oozes up. Peel the adhesive backing from the back of the small medallion. Press the medallion FIRMLY in place to cover the 2nd weight bore. Wipe off any excess epoxy and clean with a grip solvent. DO NOT CLEAN WITH ACETONE or the paint on the top of the medallion will come off.
TIPS
- It is okay to use tip weight pins epoxied into the open tip of the shaft in addition to the weight bore plugs, if a much higher swingweight is required.
- Weight plugs CANNOT be installed after the shaft has been installed.
- To remove lead plugs from the Swingweight Bore, remove the shaft and drill out the plug with a 1/4-inch bit. Tungsten weight plugs cannot be drilled out. For tungsten weights, heating in and outside the hosel MAY allow you to’knock out’the plug by tapping the hosel firmly on the workbench.
- Weight bore dimensions are 7.5mm dla. x 14mm deep. Two weight plugs of different mass or material may be stacked as long as they do not exceed the 14mm depth of the swingweight bore.
- Do not overuse epoxy. A thin coat on the shaft AND on the Inside of the hosel bore is sufficient as long as the tip is abraded properly.
- The weight added to each head to achieve the same swingweight WILL commonly vary from 1 to 3 swingweight points due to the collective effect of the various error tolerances of each componentshaft head, grip and length.
DUAL WEIGHT BORE CLUBHEAD INSTRUCTIONS
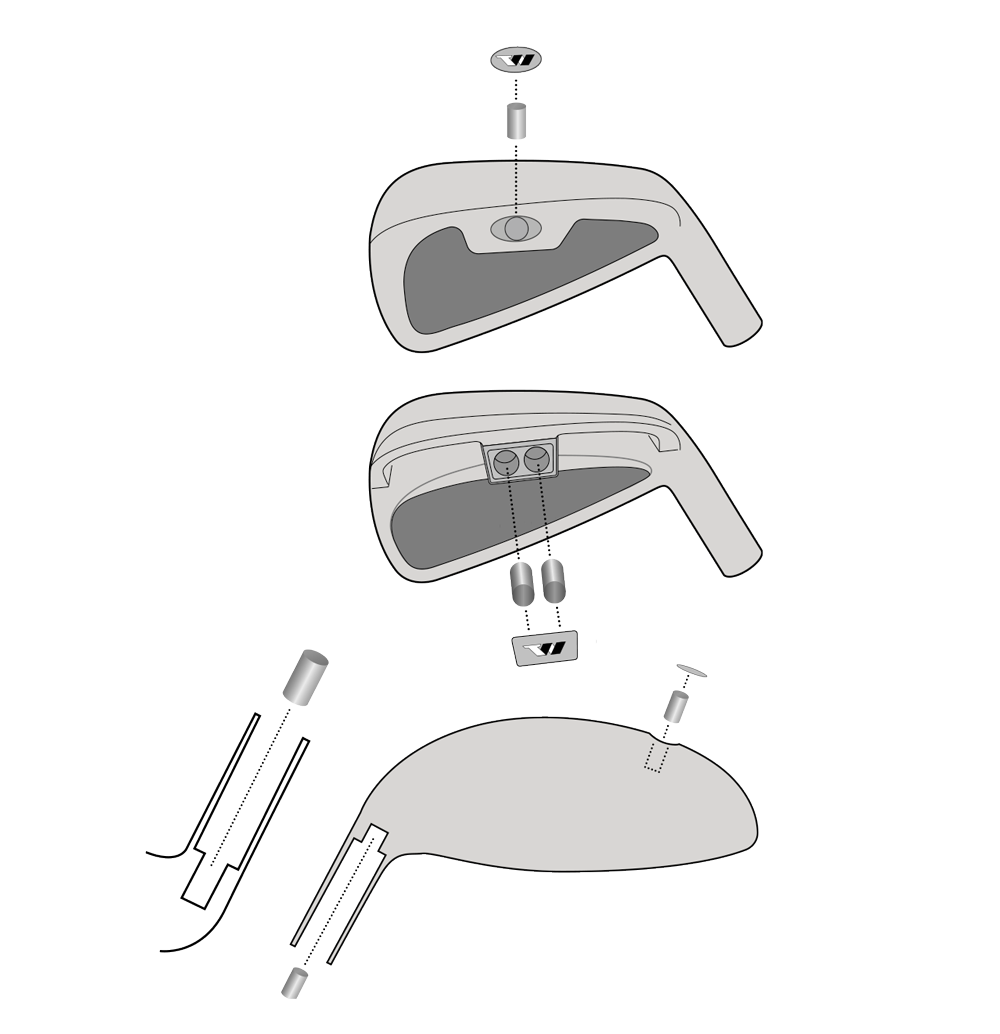
The twin weight bore design of specific Wishon Golf iron models is created to allow clubmakers to customize the swingweight/MOI for a wider range of shaft weight, length and grip weight options. The twin weight bores can fully accept the 2g brass or 6g tungsten weight plugs. The 4g brass weight can be ground shorter to fit when a weight addition of less than 4g but more than 2g is required to achieve the desired final swingweight or MOI.
Each Wishon Golf iron model with twin weight bores is also manufactured with the usual hosel weight bore at the bottom of the shaft insertion bore that can accept any of the four different Wishon Golf weight plugs from 2g to 9g. With the combination of the twin weight bores on the back of the head and the hosel weight bore, the addition of up to a maximum of 21 grams to each iron head is possible. (Hosel weight bore 9g + twin back cavity weight bores, 6g each)
An addition of up to 12g in the heel side of an iron head will only move the center of gravity 1/8” toward the heel side of the head. If the golfer is hesitant to have any weight added to the heel side of the head, the twin weight bores in the back of the head will allow normal swingweight/MOI assembly without having to use the hosel weight bore.
989CLA Irons
The model 989CLA irons are designed to a slightly lighter head weight for each iron head to allow the assembly to longer lengths while still keeping the swingweight/MOI at more normal ranges. With the lighter head weights combined with the ability to add as much as 21g through the three weight bores, it is possible to achieve a normal swingweight/MOI over a range of 1.5” in length. Based on a 5-iron, it is possible to achieve a D2 swingweight with a 125g shaft and 50g grip for lengths from 37” to 38.5”. Also based on a 5 iron, it is possible to achieve a D1 swingweight with a 75g shaft and 50g grip for lengths from 37.5” to 39”.
Steps for Assembly
1. After shaft tip trimming, abrade the shaft tip and test fit the shaft without epoxy to ensure it penetrates fully to the bottom of the shaft installation bore. Install the ferrule and use the shafting bore to push the ferrule into its final position on the shaft.
2. Measure for the desired playing length and final trim the shaft from the butt end. (NOTE: Most shafts are butt trimmed to length. However a few shafts are fully tip trimmed to length so always be sure of the trimming instructions)
3. Pre-check the club for swingweight/MOI. First install any build up tape required in the assembly, then slide a slit grip of the weight to be used in the assembly fully over the butt. Check the swingweight/MOI of the ‘dry assembled’ club on the appropriate machine. Note the number of swingweight points or g-cm2 (MOI) to be added to achieve the desired measurement.
4. Select the proper mass weight plug(s) to add to the weight bores in the clubhead to achieve the desired swingweight/MOI. Perform any grinding of any weight plugs to achieve the desired weight on the stone wheel of a bench grinder, securing the weight plug with a vice grip wrench. Weight plugs are available from Diamond Golf as follows:

5. Test assemble the club with the final weight plug(s) to check the swingweight one last time before assembly.
6. Accurately mix the proper epoxy for shaft installation. Place a healthy dab of epoxy on the end of a narrow stick/dowel (@1/8”-1/4” or 3mm-5mm diam.) and swab the bottom of the weight bore with the epoxy. Drop the weight into the weight bore and press firmly into the bore. (For tungsten weights be sure to install with the slot end UP) A small amount of epoxy should ooze up the sides of the bore. Install the shaft with a rotating motion with epoxy coating the sides of the shaft bore as well as the abraded tip of the shaft.
7. After weight plug installation into the rear cavity weight bore(s) clean excess epoxy from the top of the weight bores and medallion cavity area. Leave or apply a small amount of epoxy around the edges of the medallion cavity. Peel the backing from the medallion and press firmly into place into the medallion cavity. Clean any excess epoxy from the edges of the medallion with a paper towel lightly dampened with mineral spirits/paint thinner.
8. After epoxy has adequately cured, shine the ferrule with acetone or Glanz-Wach polishing. Install the grip and final clean/inspect the club.
TIPS
- It is OK to use a tip weight epoxied into the shaft tip if all weight bores are filled to the max and you must add more weight to achieve the desired swingweight.
- Weight plugs cannot be installed in the HOSEL weight bore after the shaft has been installed.
- To remove weight plugs from the hosel weight bore, remove the shaft. Use a 9/32” or 7mm drill bit to drill into the bore to the top of the weight plug to remove epoxy covering the weight plug. For tungsten weights use a sharpened thin metal rod to clean the epoxy from the slot on top of the weight. For brass plugs, secure the head in a drill press with a proper hosel clamp with the hosel vertical. Use a 9/32” or 7mm drill bit to drill out (destroy) the brass weight plug. For tungsten weights use a small flame torch to heat all around the base of the hosel adjacent to where the weight plug is inside the head. Keeping the flame always moving, heat for 30 secs. Insert a flat head screwdriver into the slot on top of the weight and twist the tungsten weight loose. If the weight won’t move, apply more heat and repeat. Hit the top of the hosel on a wood surface firmly and repeatedly to knock the tungsten weight out of the weight bore.
- Do not overuse epoxy for shaft installation but be sure to use enough epoxy in the weight bore to make the epoxy ooze up the sides of the weight plug when the plug is pressed into the weight bore.
- Always use a small amount of epoxy to secure the medallion that covers the rear twin weight bores. Never rely only on the adhesive on the back of the medallion to keep it permanently secure.
- If using BOTH the rear weight bore(s) and the hosel weight bore in an assembly, install the weight plugs in the rear cavity weight bore FIRST and secure the medallion cover before installing the weight in the hosel weight bore and the shaft in the head.
Assembly & Performance Instructions
Wishon Golf’s 719MW driver is designed to offer multiple fitting options to clubmakers. With the adjustable hosel sleeve, clubmakers can offer golfers a choice of different LIE and FACE ANGLE options. In addition, with the clubhead HELD SQUARE in the address position, the hosel sleeve can be used to offer different LOFT options. Remember, using the sleeve to offer different lofts will only work if the golfer is trained to address the ball with the face held square to the target. Please note using the sleeve to offer different lofts will eliminate any chance of achieving a lie or face angle change.
The 719MW is available in 9° and 11° loft versions and through Diamond Golf’s Hand Select Program, a 719MW-9° can be selected with lofts of 8.5°/9°/9.5°. The 719-11° model can be selected with lofts of 10.5°/11°/ 11.5°. Each model’s spec loft is achieved when the head is soled on the ground, regardless of the hosel sleeve position. But again, using the hosel sleeve to offer different lofts will only work if you address the ball with the face held square to the target.
The hosel sleeve of the 719MW driver is designed to accept only 0.335” tip shafts. We do NOT recommend reaming the sleeve to accept larger tip diameter shafts. If you need to remove the shaft from the sleeve, we advise using Diamond Golf’s OEM Adaptor Saver Kit (#GW0130) in conjunction with a quality shaft extractor tool/machine.
719MW Sole Weights – Function & Use
The 719MW driver is designed with optional sole cavity weights in 2g, 4g, 6g, 8g, 10g, 20g and 30g increments. The standard spec weight of the head – without any of the above weights included – is 169g, so a selection of the cavity weights can be used to achieve the finished head weight required. Which weights are used will depend entirely on the head weight needed to achieve a desired swingweight/MOI, based on the shaft weight and finished length used for the club build.
We strongly recommend that each of the four cavities is filled with one of the weights.
The 2, 4, 6, 8 and 10 gram weights are used to achieve the desired final swingweight/MOI when assembling the driver. Because of the adjustable hosel sleeve, there is no hosel weight bore in the 719MW driver. Hence the smaller increment weights can be fitted into ANY of the unused sole weight cavities when finalizing the swingweight or MOI of the club. The weights that are 10g or less are too light to have any visible effect on shot shape/shot height.
The 20g or 30g weights are intended to be used to slightly change shot shape or shot height/spin. Players with a driver clubhead speed greater than 100mph who hit the ball on centre with reasonable consistency can notice a slight shot shape/shot height effect from the 20g weight, or a more significant shot shape/shot height effect from the 30g weight. Players with a clubhead speed under 100mph or who hit the ball frequently off centre are unlikely to notice any shot shape/shot height change from the 20g weight, but can see an effect from the 30g weight.
- To enhance a draw or slightly reduce a fade tendency, place the 20g/30g weight in the heel side weight cavity.
- To enhance a fade or slightly reduce a draw tendency, place the 20g/30g weight in the toe side weight cavity.
- To encourage a higher launch angle/trajectory/spin, place the 20g/30g weight in the rear weight cavity, furthest from the face.
- To encourage a lower launch angle/trajectory/spin, place the 20g/30g weight in the front weight cavity, closest to the face.
- You can also increase the MOI and further enhance off center hit performance by placing one 10g weight in the toe side weight cavity, and one other 10g weight in the heel side weight cavity. The other two cavities, front and rear, are still available for final swingweight/MOI adjustments with any of the lighter weights.
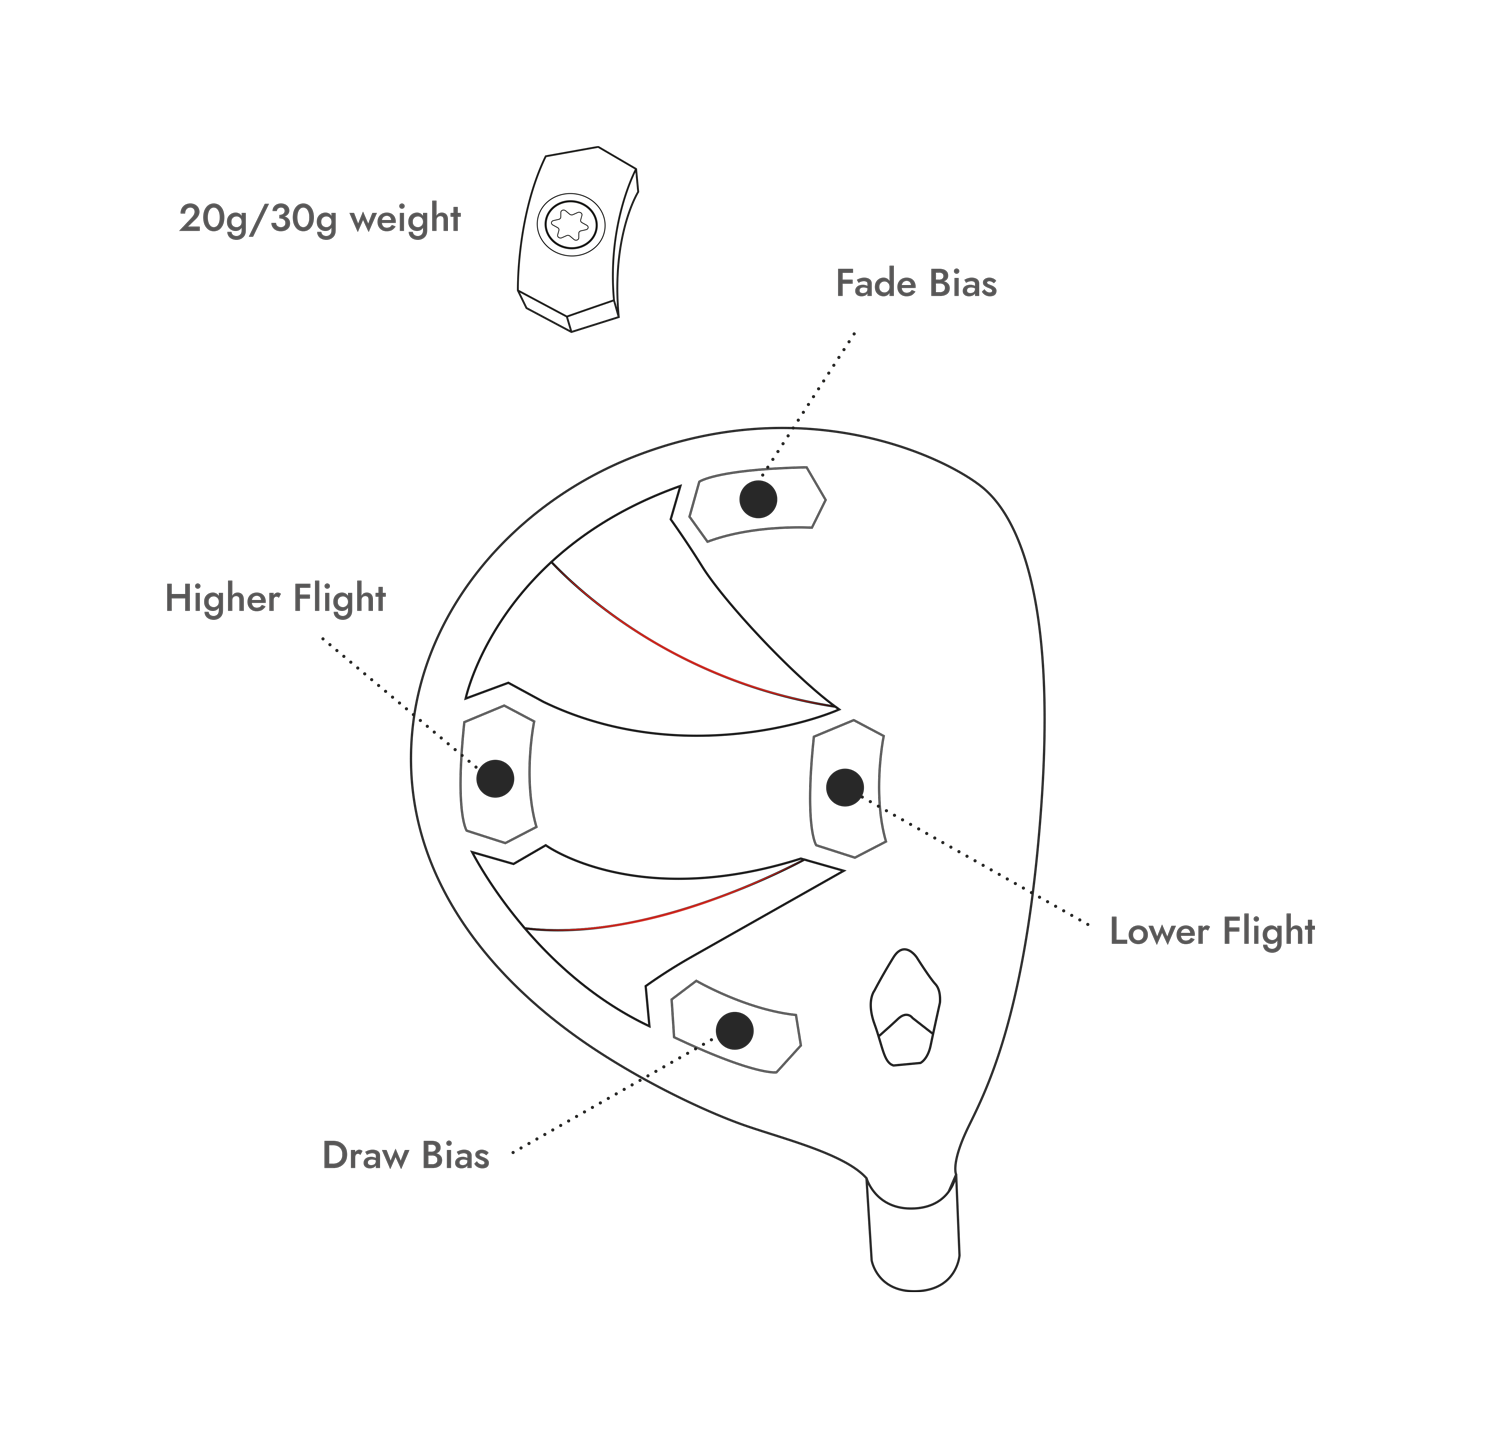
To ensure the longevity and proper function of the Wishon 719MW driver, it’s important to handle the head weights with care during installation.
Important Installation Guidelines for Head Weights:
- 2g Weight: Due to the soft material construction of the 2g weight, this weight only needs to be screwed in until the top of bolt and the weight sit flush inside the cavity and does not need further tightening.
- Do Not Torque Down Lighter Weights: Specifically, the 4g, 6g, 8g, and 10g weights should be installed by hand-tightening only. Applying additional torque can strip the threads or cause other damage.
- Handling Heavier Weights (20g and 30g): While the 20g and 30g weights are heavier and may seem to require more secure fastening, it’s still recommended to hand-tighten these weights. If additional security is necessary, use a thread lock to secure them without over-tightening.
Always ensure that weights are snug but not overly tight. Over-tightening can lead to thread damage, compromising the integrity of the clubhead.
719MW Adjustable Hosel Sleeve – Function & Use
The adjustable hosel sleeve in the 719MW driver is primarily to be used to customize the LIE and the FACE ANGLE for custom fitting purposes. However, the sleeve can alternatively be used to create custom LOFT changes, as long as the golfer knows to always hold the club with the face square after each sleeve adjustment.
The following chart reveals the CHANGE in the lie and face angle specs for each of the 8 sleeve positions for the 9° and 11° models. The change in lie and face angle is in relation to the measured lie and face angle of each 719MW head, when it is measured traditionally with the hosel sleeve in the N position. (Hosel sleeve designations: N= Neutral; C=Closed; U=Upright; O=Open)
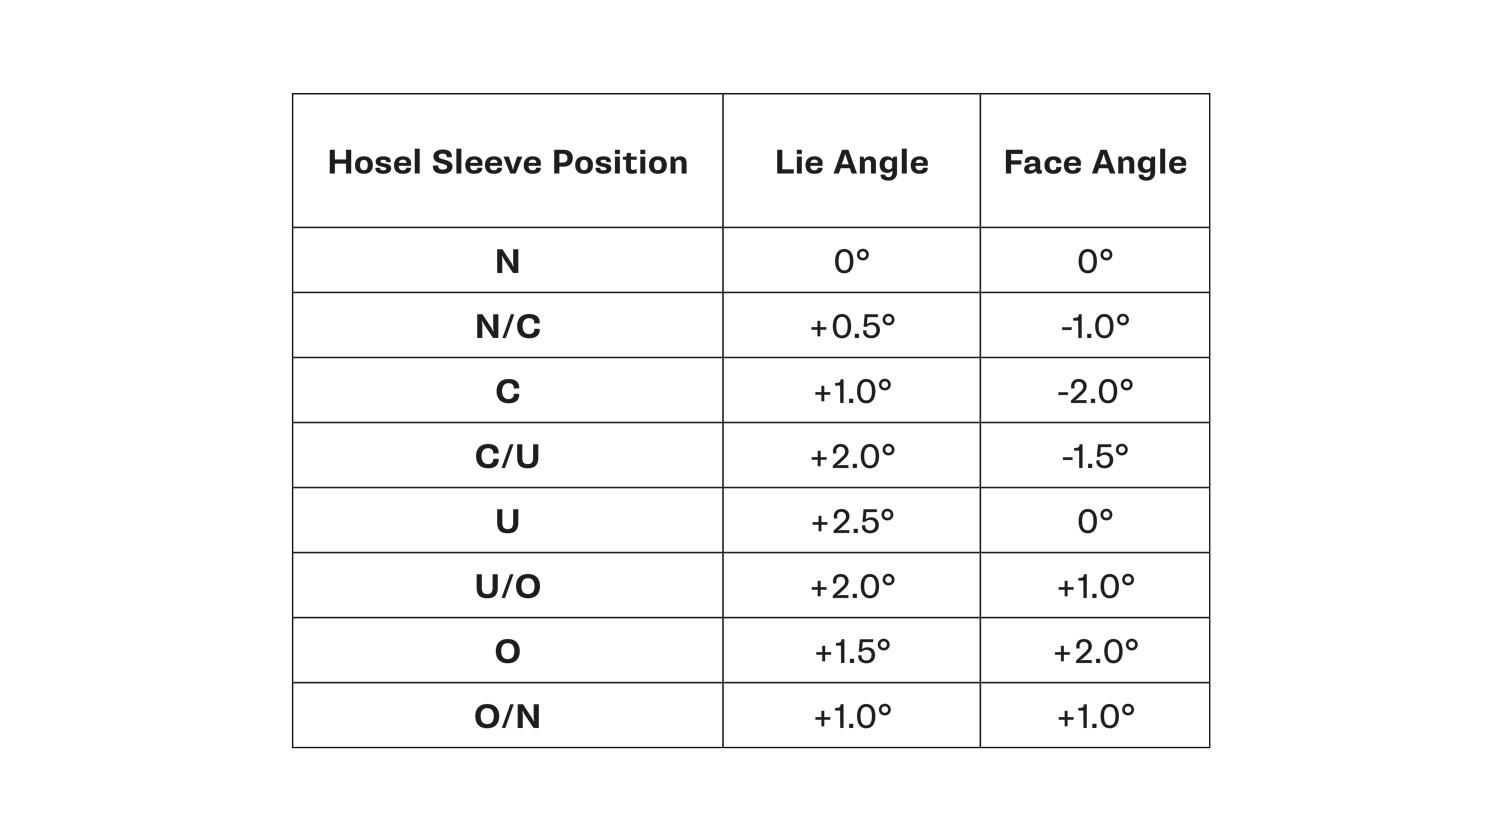
Note: Column Entries represent the CHANGE in Lie and Face Angle from the measured Lie and Face Angle of the head in the N hosel position. For the Face Angle, minus (-) means more closed, plus (+) means more open.
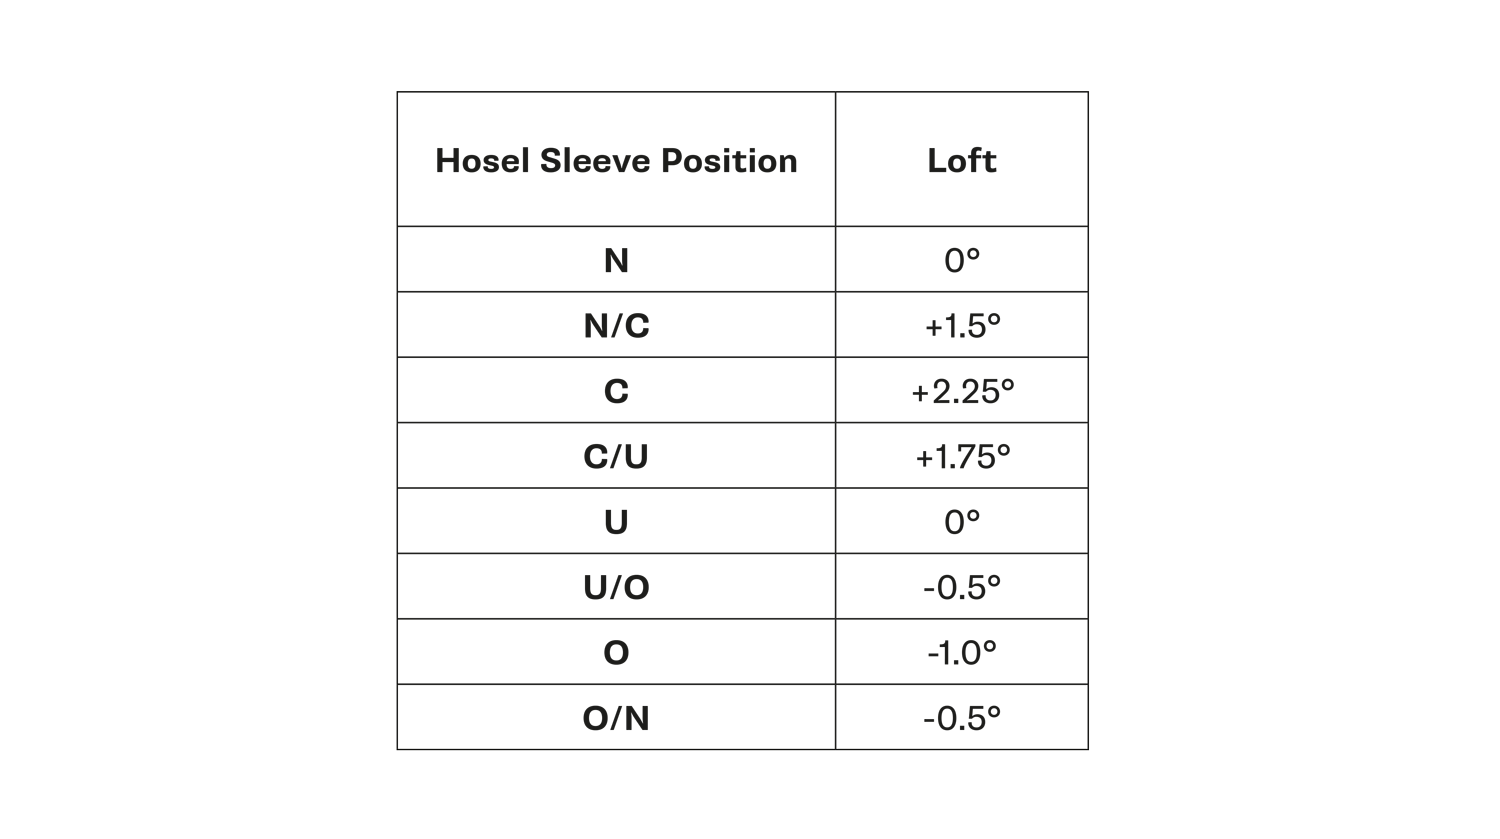
The following chart reveals the CHANGE in the loft for each of the 8 sleeve positions for the 9° and 11° models. IMPORTANT: The 719MW hosel sleeve will only change loft as long as the golfer knows to always hold the club with the face square after each sleeve adjustment. When used to change loft, the sleeve cannot also offer a lie or face angle change.
EQ1–NX
IRONS ASSEMBLY INSTRUCTIONS
Wishon Golf EQ1 Irons are designed to be built only for single length assembly. Do not try to build the EQ1 irons to conventional incremental lengths because the head weights and lie angles are not compatible with conventional length assembly.
With the hosel weight bore and 275g (+/-3g) head weight for each head, depending on the shaft weight and grip weight being used, the EQ1 irons can be assembled to lengths from 35.5” to 37.5” and achieve a relatively normal range of swingweight (or MOI).
Shaft tip trim is to be done the same for each iron in the set as per the single length chosen for the assembly. For example, if you are building the EQ1 irons to an 8-iron single length (36.5”) ALL shafts in the set are to be tip trimmed as per an 8-iron installation. If the single length is to be based on a 7-iron length (37”) ALL shafts in the set are to be tip trimmed as per a 7-iron installation.
Steps for Assembly
1. After tip trimming, properly sand/abrade the shaft tip and test fit the shaft without epoxy to ensure the proper fit to the bottom of the shafting bore.
2. Install the ferrule to its proper position up the shaft and dry install the shaft into the hosel so the tip bottoms out in the bottom of the shafting bore. Measure for the desired playing length and trim for that length from the butt end of the shaft. (NOTE: Most shafts are trimmed for length from the butt end of the shaft. However some shafts are fully trimmed for length from the tip. Be sure of the correct shaft trim instructions for the shaft being used in the assembly.)
3. Pre-check each club for swingweight/MOI with the fully trimmed shaft using a surrogate grip (i.e. split grip). Note the number of swingweight/MOI points to be added to achieve the final desired swingweight/MOI. ALL shafts in the set are to be tip trimmed as per an 8-iron installation.
4. Select the proper weight plug which will equal the swingweight/MOI addition required for each club. The following weight plugs are available from Diamond Golf:

5. Test assemble the club with the weight plug (no epoxy) and check the swingweight/MOI one last time before final assembly.
6. Properly mix the shafting epoxy. Drop a healthy dab of epoxy from the end of a small diameter mixing stick down into the weight bore. Drop the weight plug into the weight bore and PUSH firmly with the thin stick to seat the weight and spread the epoxy up the sides of the weight. (For the 6g/9g tungsten weights ALWAYS INSTALL THE WEIGHT WITH THE SLOT END UP) Apply a thin coating of shafting epoxy to the inside walls of the hosel bore and the abraded tip of the shaft. Install the shaft with a slow rotating motion to fully seat the shaft into the bore. Wipe excess epoxy from between the top of the hosel and base of the ferrule with a paper towel soaked in acetone or solvent. Set the club aside head down/shaft up for the epoxy to cure.
7. After the epoxy is cured shine the ferrule with acetone or polish with glanz-wach on an unstitched buffing wheel. Install the grip and final inspect/clean the club and check the swingweight one last time before assembly.
8. Accurately mix the proper epoxy for shaft installation. Place a healthy dab of epoxy on the end of a narrow stick/dowel (1/8”-1/4” or 3mm-5mm diam.) and swab the bottom of the weight bore with the epoxy.
Drop the weight into the weight bore and press firmly into the bore. (For tungsten weights be sure to install with the slot end UP) A small amount of epoxy should ooze up the sides of the bore. Install the shaft with a rotating motion with epoxy coating the sides of the shaft bore as well as the abraded tip of the shaft.
10. After weight plug installation into the rear cavity weight bore(s) clean excess epoxy from the top of the weight bores and medallion cavity area. Leave or apply a small amount of epoxy around the edges of the medallion cavity. Peel the backing from the medallion and press firmly into place into the medallion cavity. Clean any excess epoxy from the edges of the medallion with a paper towel lightly dampened with mineral spirits/paint thinner.
11. After epoxy has adequately cured, shine the ferrule with acetone or Glanz-Wach polishing. Install the grip and final clean/inspect the club.
TIPS
- • It is ok to use a shaft tip weight in addition to the hosel weight plugs. Note when a tip weight is used the tip end of the shaft will have to be slightly ground down or tipped more to allow the ferrule to seat flush against the top of the hosel.
• Weight plugs must be installed before the shaft is installed.
• The weight plugs can be removed. For the 2g/4g brass weights it is easiest to clamp the hosel vertically in a drill press and drill/destroy the brass plug with a 9/32” or 7mm drill bit. For the tungsten weights, first clean out all epoxy to the top of the weight with an 11/32” or 9mm drill bit until you can see the top of the tungsten weight in the weight bore. Use a sharpened thin metal rod to dig the epoxy from the slot on top of the weight. Heat the outside of the base of the hosel with a butane/propane torch in the area where the weight bore is, to soften the epoxy holding the weight plug. After 30-40 secs of heating, insert a flat-head screwdriver into the slot on top of the weight and try to rotate the weight. Use more heat if the weight won’t move. Once the weight begins to rotate, keep rotating around and around until the weight feels loose. Tap the top of the hosel on a wood surface very firmly to knock the weight out.
EQ1–NX
WOODS & HYBRIDS ASSEMBLY INSTRUCTIONS
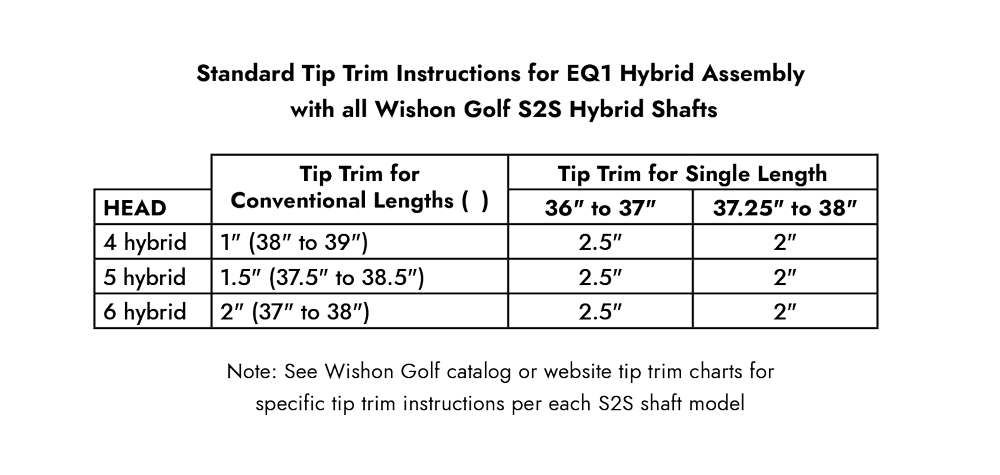
The Wishon Golf EQ1 hybrids are available in #4, 5, or #6 hybrid heads. They are designed to be assembled to the same length as the EQ1 single length irons you may be building, or they can be built to any lengths longer than the single length irons up to conventional hybrid lengths of #4-38.5”, #5-38”, #6-37.5”. ½” over those lengths is also possible with a lightweight graphite shaft (≤75g).
NOTE! – The EQ1 hybrids are designed with a 0.335” hosel bore to accept any of the Wishon Golf S2S hybrid shaft designs, or any hybrid shaft with a 0.335” parallel tip. The ferrule of choice to use with a 0.335” hybrid shaft from Diamond Golf is the Wishon ferrule model #121-HY-IR.
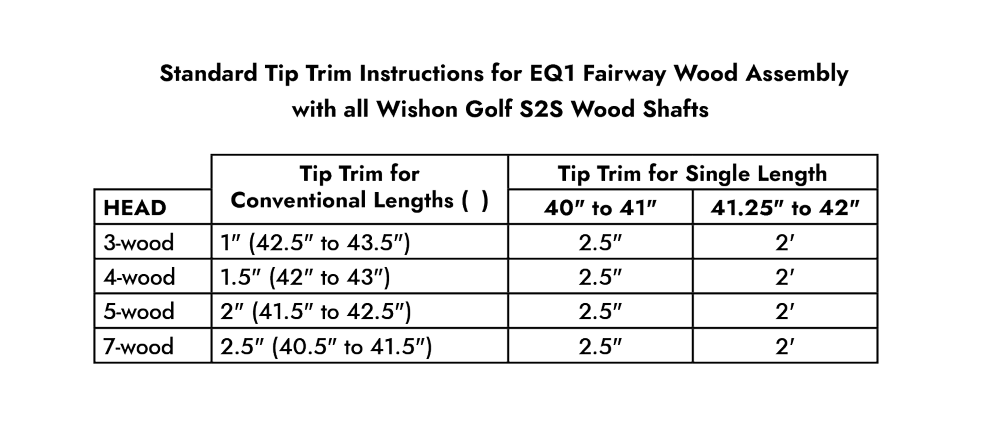
The Wishon Golf EQ1 fairway woods are available in #3, 4, 5 and 7 wood heads. They are designed to be assembled to their own specific single length options, or they can be built to any lengths longer than the single length options up to conventional fairway wood lengths of #3-43”, #4-42.5”, #5-42”, #7-41”. ½” over those lengths is also possible with a lightweight graphite shaft (≤65g).
The EQ1 fairway woods are also designed with a 0.335” hosel bore to accept any of the Wishon Golf 0.335” parallel tip wood shaft designs, or any other 0.335” tip shaft for woods. The ferrule of choice to use with EQ1 fairway woods from Diamond Golf is the Wishon ferrule model #121-WD-STD.
There are four different weight bores in each EQ1 to allow the assembly of the woods and hybrids to normal ranges of swingweight/MOI for a wide variety of lengths. The hosel weight bore and toe sole weight bore both hold up to a maximum of a 9g tungsten weight. The twin rear sole weight bores both hold a maximum of a 6g tungsten weight to allow a total of 30g of weight to be added to each EQ1 hybrid or wood head.
The following weight plugs are available from Diamond Golf International:

INSTALLATION OF WEIGHTS & MEDALLION COVERS
1. When multiple weights are required in the assembly, it is best to balance the position of the weights to keep the Center of Gravity from moving too much. Dividing up the weight to be added equally between the hosel weight bore and toe/sole weight bore or just using the rear weight bores only will always keep the CG from moving any measurable amount.
2. If a slightly higher flight is desired for a player with a later release, use of the twin rear weight bores only will move the CG back in the head to achieve that.
3. Always put a dab of epoxy on the bottom and sides of the weight bore before installation of each weight plug. Push firmly down on the weight to make the epoxy ooze up the sides of the weight plug for the most secure installation.
4. Always use a thin coating of epoxy on the upper ledge of the sole weight bores to improve the ability of the covering medallion to remain secure. Always peel off the paper backing over the back adhesive of the medallion before pressing into place on top of the thin epoxy coating.
5. The half-moon shape medallion covering the twin rear weight bores is curved to fit the cavity on top of the weight bores. THERE IS A DIFFERENT MEDALLION FOR THE HYBRID HEADS AND FOR THE FAIRWAY WOOD HEADS. The medallion covering the rear weight bores on the hybrid has a RED DOT above the Wishon Golf name. The medallion covering the rear weight bores on the fairway has no marking above the Wishon Golf name. Additional toe/sole and rear weight bore medallions can be ordered from Diamond Golf International.
6. Always install the tungsten weights with the slot end up. To remove a tungsten weight, heat the epoxy holding the weight in the bore with a small butane torch. After 20-30 secs of heating twist the weight loose with a flat-head screwdriver inserted into the slot on the end of the plug. Brass weights can be removed by drilling the weight with a 9/32” (7mm) drill bit.
7. If you are using the hosel weight bore and one or more of the sole weight bores, we recommend installing the weights and medallions in the sole weight bores first. Then install the weight in the hosel weight bore followed by installation of the shaft. It is easier to install weights in the sole weight bores before the shaft is installed.

© COPYRIGHT 2025 WISHON GOLF
